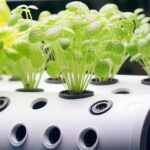
最近、水耕栽培を始めました。水耕栽培は水の管理が大切なのですが、なかなか大変です。
もっと簡単に水を管理したいと思い、今回の方法を考えました。
何をしたいかは本編に記載しています。本記事ではスケッチについて書いています。
本編・・・・ESP32でGoogle sheetとLineに水耕栽培の水温と流量を通知して管理する方法【本篇】
全スケッチ
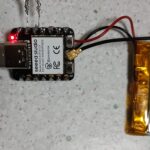
マイコンボードとしては、XIAO ESP32C3を使用して、Arduino IDEで作りました。
いきなりですが、全スケッチはこのとおりです。
#include <WiFi.h>
#include <WebServer.h>
#include <HTTPClient.h>
#include <DallasTemperature.h>
#include <OneWire.h>
#include "time.h"

#include <BLEDevice.h>
#include <BLEServer.h>
#include <BLEUtils.h>
#include <BLE2902.h>

const int ONE_WIRE_BUS = 8;
const int ledPin =  D10;      // LED connected to digital pin 10
const int isrPin = D7;     //

OneWire oneWire(ONE_WIRE_BUS);  //温度計インタフェース設定
DallasTemperature sensors(&oneWire);
DeviceAddress Temp_Sensor1 = {0x**, 0x**, 0x**, 0x**, 0x**, 0x**, 0x**, 0x**};
DeviceAddress Temp_Sensor2 = {0x**, 0x**, 0x**, 0x**, 0x**, 0x**, 0x**, 0x**};

float temp1,temp2,flow1;
hw_timer_t * timer = NULL;
volatile unsigned long flowperiod;
volatile int flowCheck,preflowCheck;
volatile int ledCounter =0;
const float flowAlarm = 0.7; //流量アラーム値 単位はリットル/分
String suion,kion,ryuuryou;

const char* ssid = "**********";   //ssid
const char* passwd = "*************"; //ネットワークパスワード
WebServer server(80);       //スマホ表示用 通信を受けるポート番号80

//Google sheet
const String url = "https://script.google.com/macros/s/AKfy******************************************************************************Ng/exec";
volatile int gglshtCounter =0;
int gglshtPeriod = 20 * 60 ; //20分ごとにgoogle sheet 書き込み

// LINE Notify設定
String LINE_NOTIFY_TOKEN = "****************************************************";

//BLE server
BLEServer *pServer = NULL;
BLECharacteristic * pTxCharacteristic;
bool deviceConnected = false;
bool oldDeviceConnected = false;
uint8_t txValue = 0;
#define SERVICE_UUID           "6be4****-****-****-****-************" // UART service UUID
#define CHARACTERISTIC_UUID_RX "6be4****-****-****-****-************"
#define CHARACTERISTIC_UUID_TX "6be4****-****-****-****-************"


void mySerial(String txdata,bool lineFeed = true){
  if(lineFeed)txdata +="\n";
  Serial.print(txdata);
  if (deviceConnected) {
     pTxCharacteristic->setValue(txdata.c_str());
     pTxCharacteristic->notify();
     delay(10);
  }
}

class MyServerCallbacks: public BLEServerCallbacks {
    void onConnect(BLEServer* pServer)    {deviceConnected = true;};
    void onDisconnect(BLEServer* pServer) {deviceConnected = false;}
};

class MyCallbacks: public BLECharacteristicCallbacks {
    void onWrite(BLECharacteristic *pCharacteristic) {
      std::string rxValue = pCharacteristic->getValue();
        if (rxValue.length() > 0) {
          mySerial(rxValue.c_str());
          mySerial(suion);mySerial(kion);mySerial(ryuuryou);
        }
    }
};

void IRAM_ATTR onTimer() {  //タイマー割込みでカウントアップ
  ledCounter++;
  gglshtCounter++;
}

void ISR_R() {        //水量センサ割込みの都度、間隔測定
 static unsigned long rapTime1,rapTime2;
 rapTime2 = millis();
 flowperiod = rapTime2 - rapTime1;
 rapTime1 = rapTime2;
 flowCheck++;
}

void setup() {
  Serial.begin(115200);     //シリアルポート設定
  bleSetup();   //BLEのセットアップ

  pinMode(ledPin, OUTPUT);
  attachInterrupt(isrPin, ISR_R, RISING);
  sensors.begin();

  timer = timerBegin(0, 80, true);
  timerAttachInterrupt(timer, &onTimer, true);
  timerAlarmWrite(timer, 1000000, true);  //1秒ごとにタイマー割込み
  timerAlarmEnable(timer);

  WiFi.begin(ssid, passwd);               //アクセスポイント接続のためのIDとパスワードの設定
  while (WiFi.status() != WL_CONNECTED) { //接続状態の確認
  delay(300);                             //接続していなければ0.3秒待つ
  mySerial(".",false);                      //接続しなかったらシリアルモニタに「.」と表示
  }

  //WiFi通信が可能となったら各種情報を表示する
  mySerial("");               //改行
  mySerial("WiFi Connected"); //接続したらシリアルモニタに「WiFi Connected」と表示
  mySerial("IP Address : " +WiFi.localIP().toString()); //IPアドレスをシリアルモニタに表示


  //スマホ表示 serverアクセスされたときの処理
  server.on("/", handleRoot);      //TOPページのアドレスにアクセス処理
  server.onNotFound(handleNotFound); //異常アドレスへのアクセス処理
  server.begin();                    //WebServer起動

  configTime( 9*3600, 0, "ntp.nict.jp", "ntp.jst.mfeed.ad.jp"); //現在時刻取得
  mesureSensor();
}


void loop() {
  delay(100);
  sensors.requestTemperatures();

  server.handleClient();

  //LED点滅 センサー測定
  if (ledCounter >= 6){                          //6秒に1回点滅
    digitalWrite(ledPin, LOW);
    ledCounter =0;
    mesureSensor();            //センサー測定
   }else if (ledCounter >= 5){
    digitalWrite(ledPin, HIGH);
  }else if (flow1 < flowAlarm){                  //流量小で毎秒点滅
    digitalWrite(ledPin, !digitalRead(ledPin));
  }

 //1時間チェック (時刻補正、Line通知用)
  static int hourNow,lastDoneHour,minuteNow;
  time_t t;
  struct tm *tm;
  t = time(NULL);
  tm = localtime(&t);
  hourNow = tm->tm_hour;
  minuteNow = tm->tm_min;
  if(minuteNow > 57) gglshtCounter=0;  //時刻補正数分前は、google sheet更新停止
  if(hourNow != lastDoneHour){
    mySerial("時刻;" +String(hourNow) +"時 oneHourProcess");
    oneHourProcess();
    lastDoneHour = hourNow;
  }


  //google sheet更新
  if (gglshtCounter >= gglshtPeriod){       //更新間隔到達で更新
    String urlFinal = url + "?waterTemp=" + temp1
      + "&airTemp=" + temp2 + "&waterFlow=" + flow1;
    mySerial(urlFinal);

    HTTPClient http;
    http.begin(urlFinal.c_str());
    http.setFollowRedirects(HTTPC_STRICT_FOLLOW_REDIRECTS);
    int httpCode = http.GET();
    mySerial("HTTP Status Code: " ,false);
    mySerial(String(httpCode));
    //---------------------------------------------------------------------
    //getting response from google sheet
    String payload;
    if (httpCode > 0) {
        payload = http.getString();
        mySerial("Payload: "+payload);
    }  //---------------------------------------------------------------------
    http.end();
    gglshtCounter = 0;
  }

  // BLE disconnecting
  if (!deviceConnected && oldDeviceConnected) {
      delay(500); // give the bluetooth stack the chance to get things ready
      pServer->startAdvertising(); // restart advertising
      mySerial("start advertising");
      oldDeviceConnected = deviceConnected;
  }
  // BLE connecting
  if (deviceConnected && !oldDeviceConnected) {
      delay(500);
      mySerial(suion);mySerial(kion);mySerial(ryuuryou);
      oldDeviceConnected = deviceConnected;
  }
}

void oneHourProcess(){        //毎時に処理(時計補正、アラーム時にLine通知)
  configTime( 9*3600, 0, "ntp.nict.jp", "ntp.jst.mfeed.ad.jp"); //時計補正
  gglshtCounter = gglshtPeriod;        //補正時にgoogle sheet更新

  if (flow1 < flowAlarm){     //アラーム時にLine通知
    String  almText("!!アラーム!! \r\n" +
                    ryuuryou + "\r\n" +
                    suion +" "+ kion + "\r\n" );
    mySerial("ToLine:" + almText);
    sendLine(almText) ;
  }
}

void mesureSensor(){     //温度、水量測定
  temp1  = sensors.getTempC(Temp_Sensor1);
  temp2 = sensors.getTempC(Temp_Sensor2);
  static float flowMinute,preflowMinute,pre2flowMinute;  //流量は3回平均
  flowMinute=(float)60*1000/flowperiod/553;
  if (flowCheck == preflowCheck) flowMinute = 0;  //センサー停止時は流量ゼロ
  preflowCheck = flowCheck;
  flow1 = (pre2flowMinute + preflowMinute + flowMinute)/3 ;
  pre2flowMinute = preflowMinute; preflowMinute = flowMinute;
  suion = "水温 : " + String(temp1,2) + "℃" ;
  kion = "気温 : " + String(temp2,2) + "℃" ;
  ryuuryou = "流量 : " + String(flow1,2) + "リットル/分";
}


void handleRoot() {  //スマホブラウザ表示
  String html;
  //HTML記述
  html = "<!DOCTYPE html>";
  html += "<html lang='ja'>";
  html += "<head>";
  html += "<meta charset=\"utf-8\">";
  html += "<title>Flow Status</title>";
  html += "</head>";
  html += "<body>";
  html += "<h1>水耕栽培の状況</h1>";
  html += "<p><h2>" +suion + "</h2></p>";
  html += "<p><h2>" +kion + "</h2></p>";
  html += "<p><h2>" +ryuuryou + "</h2></p>";
  html += "</body>";
  html += "</html>";

  // HTML出力
  server.send(200, "text/html", html);

}

//スマホブラウザ表示 異常アドレスへのアクセス処理
void handleNotFound(void) {
  server.send(404, "text/plain", "Not Found ");
}


// line通知
void sendLine(String body){
  HTTPClient httpClient;
  String postUrl = "https://notify-api.line.me/api/notify";
  httpClient.begin(postUrl);
  httpClient.addHeader("Content-Type", "application/x-www-form-urlencoded");
  httpClient.addHeader("Authorization", "Bearer " + LINE_NOTIFY_TOKEN);
  // POSTしてステータスコードを取得
  int status_code = httpClient.POST("message=" + body);
  mySerial(httpClient.getString());
  if (status_code == 200) {
    mySerial("[SUCCESS]LINE Notify (URL:" + postUrl);
  } else  {
    mySerial("[SUCCESS]LINE Notify (URL:" +postUrl + ")Code:"+ status_code);
  }
  mySerial("");
  httpClient.end();  // HTTPClinetを終了する
}


void bleSetup(){
  // Create the BLE Device
  BLEDevice::init("myESP32_UART");  //スマホなどのBLEターミナルから見えるデバイス名

  // Create the BLE Server
  pServer = BLEDevice::createServer();
  pServer->setCallbacks(new MyServerCallbacks());

  // Create the BLE Service
  BLEService *pService = pServer->createService(SERVICE_UUID);

  // Create a BLE Characteristic
  pTxCharacteristic = pService->createCharacteristic(
										CHARACTERISTIC_UUID_TX,
										BLECharacteristic::PROPERTY_NOTIFY
									);

  pTxCharacteristic->addDescriptor(new BLE2902());

  BLECharacteristic * pRxCharacteristic = pService->createCharacteristic(
											 CHARACTERISTIC_UUID_RX,
											BLECharacteristic::PROPERTY_WRITE
										);

  pRxCharacteristic->setCallbacks(new MyCallbacks());

  // Start the service
  pService->start();

  // Start advertising
  pServer->getAdvertising()->start();
  mySerial("Waiting a client connection to notify...");
}
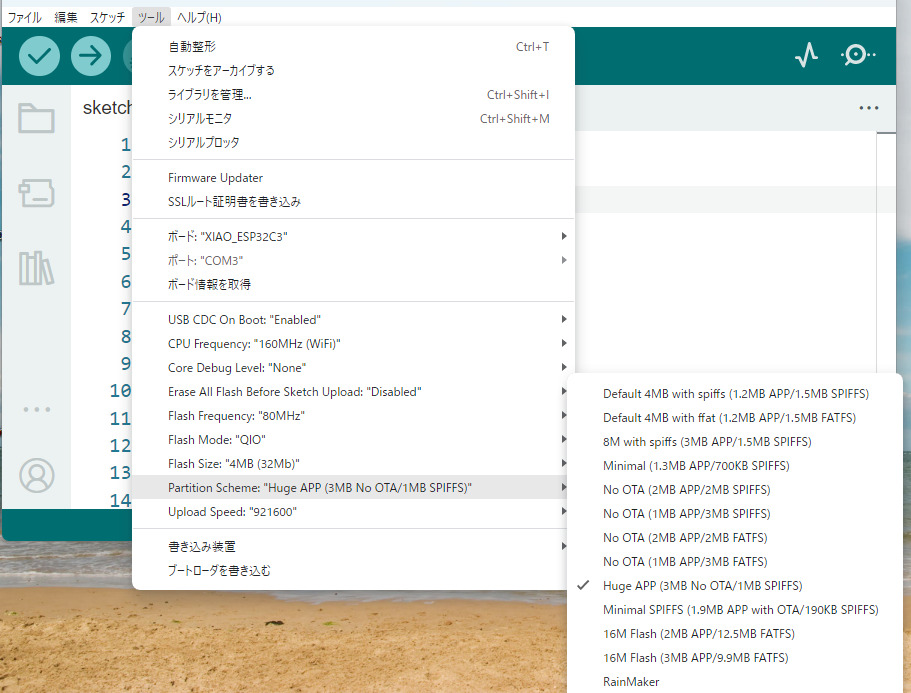
スケッチのサイズについて
スケッチが大きくなりすぎたため、自分の環境では設定を変更する必要がありました。
Arduino IDEのメニュー > ツール > Pertition Scheme > Huge APP
温度センサー・・・DS18B20を使用した温度プローブ
温度センサーとしては、DS18B20を使用した温度プローブを使いました。
DS18B20は、シリアルインタフェースを持った温度計です。そのインタフェースを使用するため、DallasTemperature.hとOneWire.hをインクルードしてます。
#include <DallasTemperature.h>
#include <OneWire.h>
次にピン番号を設定しますが、ひとつのピンに複数のセンサーを接続できるので宣言するのは、ひとつのピンだけになります。
const int ONE_WIRE_BUS = 8;
続いて、sensorsと宣言した後に、センサー個体ごとに持つ固有のシリアルコードを設定します。なお、購入した温度センサーにはシリアルコードの記載は無かったため、別のスケッチで読みだして、本スケッチに入れました。
OneWire oneWire(ONE_WIRE_BUS);  //温度計インタフェース設定
DallasTemperature sensors(&oneWire);
DeviceAddress Temp_Sensor1 = {0x**, 0x**, 0x**, 0x**, 0x**, 0x**, 0x**,0x**};
DeviceAddress Temp_Sensor2 = {0x**, 0x**, 0x**, 0x**, 0x**, 0x**, 0x**,0x**};
あとは、読み出したいときにセンサーから温度を読み出すだけです。
  temp1  = sensors.getTempC(Temp_Sensor1);
  temp2 = sensors.getTempC(Temp_Sensor2);
流量センサー・・・SEN-HZ21WI G1/2
流量センサーSEN-HZ21WI G1/2 は、パイプの中のスクリュー?のようなものが回転し、回転ごとにパルス出力するものです。
スケッチでは、まず接続するピンを宣言します。
const int isrPin = D7;
あとは、setupの中で、パルスが来たら割込みが上がるようにして
attachInterrupt(isrPin, ISR_R, RISING);
割込みで前回割込みとの時間を常に測定します。
void ISR_R() {        //水量センサ割込みの都度、間隔測定
 static unsigned long rapTime1,rapTime2;
 rapTime2 = millis();
 flowperiod = rapTime2 - rapTime1;
 rapTime1 = rapTime2;
 flowCheck++;
}
そして、流量が欲しいときに測定した時間から流量を算出します。ネットで検索したところ、流量1リットルあたり553パルス発生するとのこと。当面の目的は、水が流れているか、とまっているかの検出なので、誤差は気にしていません。時間ができたら、実際の流量と比較したいと思います。
  static float flowMinute,preflowMinute,pre2flowMinute;  //流量は3回平均
  flowMinute=(float)60*1000/flowperiod/553;
  if (flowCheck == preflowCheck) flowMinute = 0;  //センサー停止時は流量ゼロ
  preflowCheck = flowCheck;
  flow1 = (pre2flowMinute + preflowMinute + flowMinute)/3 ;
  pre2flowMinute = preflowMinute; preflowMinute = flowMinute;
続きは後編記事へ。
記事が長くなったので、続きは後編記事としました。
ESP32でGoogle sheetとLineに水耕栽培の水温と流量を通知して管理する方法【スケッチ(後編)】
- Google spreadsheetにデータ保存
- スマホで水の流れていることを確認[ブラウザとwebサーバー]
- 水の流量が減ったらLINEに通知
- マイコンボードの動作状況は、スマホでBluetooth LE経由で確認
本記事のハードでやっていること
ー>ESP32でGoogle sheetとLineに水耕栽培の水温と流量を通知して管理する方法【本篇】
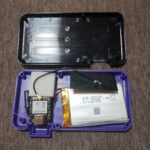
本記事のハード
ー>ESP32でGoogle sheetとLineに水耕栽培の水温と流量を通知して管理する方法【ハードウェア】